Wednesday, January 29, 2014

A Special Anniversary Card {Maja Design & Cheery Lynn Designs}

 
So today is my day to share a Maja Design project with everyone and it is also my last day as guest designer over at Cheery Lynn Designs (dies)...so I thought I would combine these products and make a special card.  My Mom and Dad's 55th anniversary is coming up in a few weeks so I thought I'd make up a special card for them.  Ever since I was a little girl, my parents always treasured the cards the most from us kids, especially if they were handmade.
 
 
I thought I would use the colors from the Maja Design Mood board this month (this mood board challenge is already finished but I wanted to be sure to do a project because I so loved the board this month....the next mood board challenge will be posted on the first Tuesday of the month - February 4rth ).
 

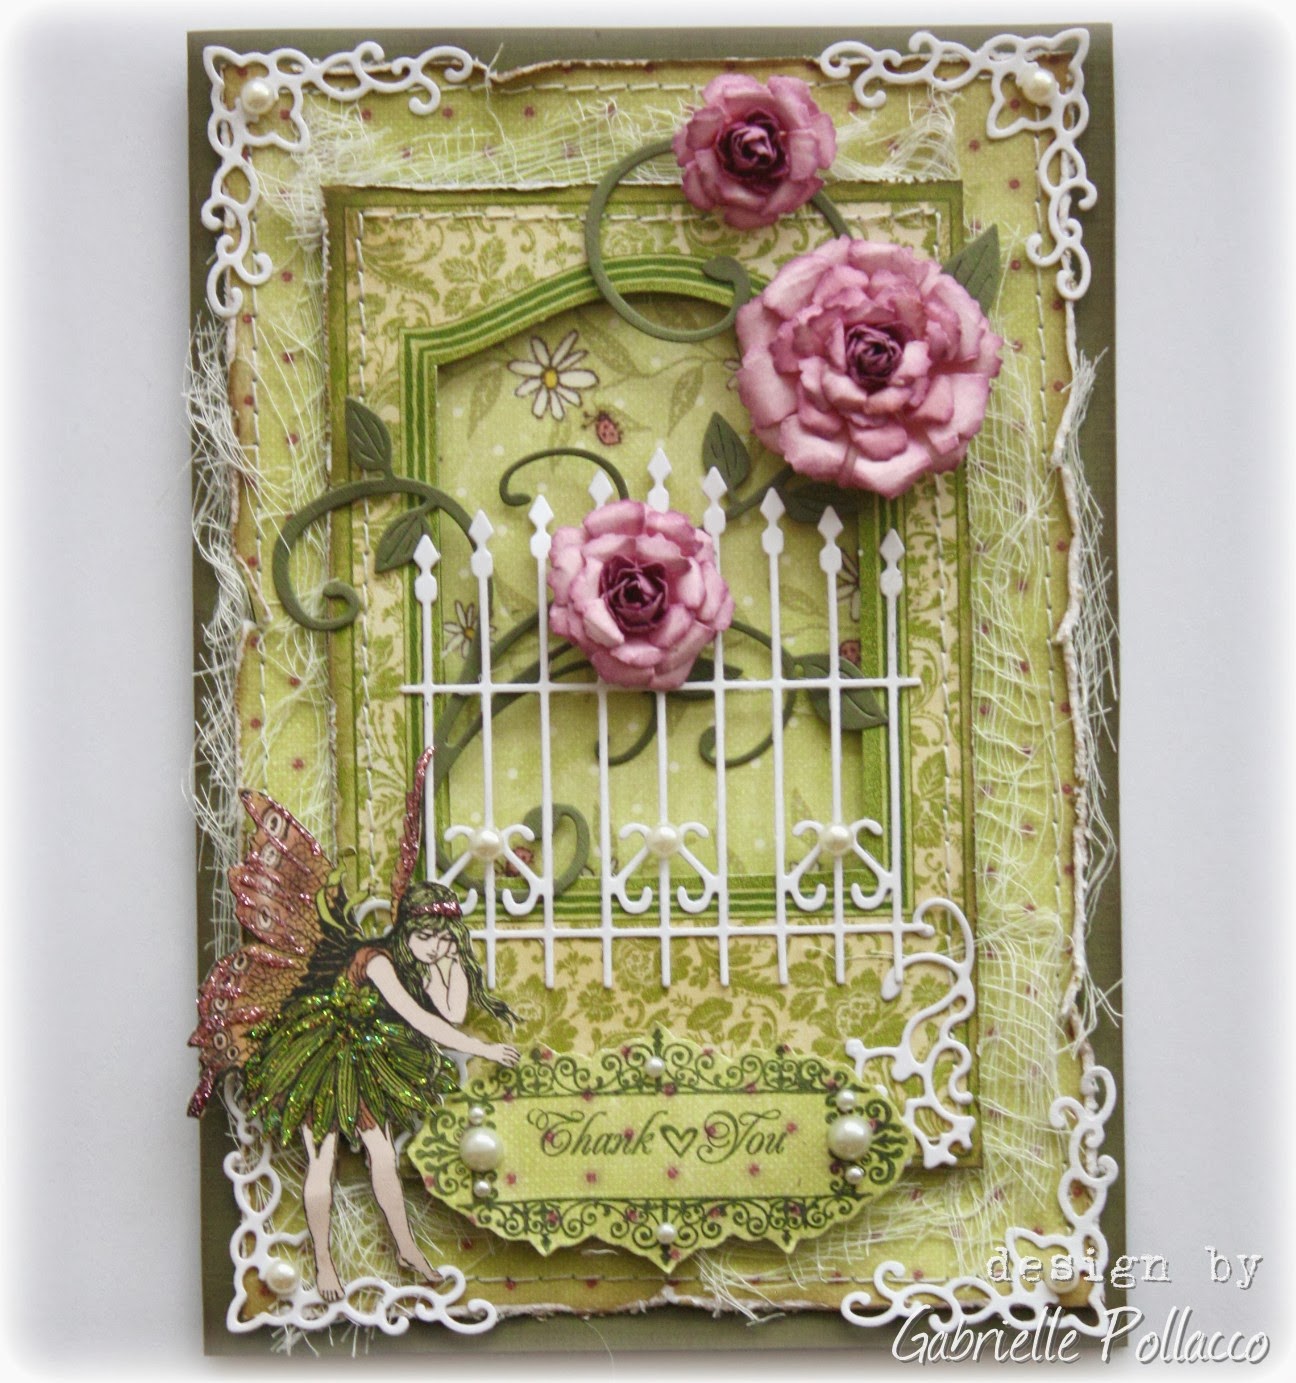
I used a bunch of pretty papers from Maja Design Vintage Frost Basics collection with some of my favorite CL dies to make this card.  For this card I went with the lovely burgundy/cream/pink papers in this beautiful new collection.


Can you tell I'm fascinated with the lattice die?  I can't seem to get enough of that one!  For this layout I mounted it behind a circle I cutout using 2 cups to trace out my circles.  For the flourishy leaf design I just had to use my favourite flourish die (I'll tell you a secret....I thought I had lost this die and was so upset, it's seriously my all-time favourite leaf/flourish die, I was ready to order myself another!....then I found it about a week ago, it was in the case for my Revolution machine (I finally remembered I put it there because I pretty much always use that die when I pull out my machine :)

I also used a couple of the lace border and lace doily designs to accent the circle design as well as the edge of the corrugated cardstock I used.  And I just love to use those lace corner designs to finish off my cards.

 
For the flowers I used the beautiful Gardenia strip die.  I just love the pretty rosy design this die gives.  The petals were cut from white cardstock and I just used some Victorian Velvet distress ink by Tim Holtz....I just randomly tinted parts of the petals using a soft make-up sponge, leaving some parts white.  I wanted a small 3rd flower for this floral cluster so I used a few of the smallest Sweet Williams die cuts to make a little rose.
 
Cheery Lynn Products used for this project:
 
Maja Design Products used for this project:
 
 
Thanks so much for stopping by my blog today!  You can find the Cheery Lynn products at many of your local scrap stores or check the links I provided in the list above.  Maja design products are becoming more and more available to the North American market, some online retailers are The Scrapbook Diaries and Moments of Tranquility.  You can also find stores in your area if you check the storefinder at the Maja Design website, I know they have been busy updating their list since the CHA. :)


Saturday, January 25, 2014

Vintage Style Fabric/Paper Journal Cover {Featuring Bo Bunny Blooms and Tresors de Luxe Lace}


I've been wanting to create a soft vintage style journal cover for ages now!  To create my book design above I chose blooms in the pink and natural colors from the gorgeous Bo Bunny blooms and combined them with gorgeous lace from Tressors de Luxe.  I thought the subtle colors would work well for this style book.  I wanted to have the cover have a nice fabric feel to it so I also incorporated the new pleated canvas strips as well from the  Bo Bunny Kraft collections.  Here is a view of the book opened so you can see front and back.

 
I kept the back very simple with just a little stitching, because the back of it needs to sit flat.  Here are a few close-ups of the cover.  


For the creamy, earth tone, large bloom I used a touch of pink paint to give the flower a two-toned look.  After gluing down the blooms, I brushed all the blooms lightly with white to give them a more aged look.
 
 
I used Bo Bunny Vintage dot (Decaf) paper to make my heart design.  I added some machine stitching to give the paper a fabric look.


I added some pearl strands, ribbons and lace to the spine to finish the book design.
 
Bo Bunny Supplies:
Blossoms: Natural Earth Bouquet, Blush Bouquet, Natural Earth Dahlia, Natural Earth Daisy, Natural Earth Zinnia
Essentials: Kraft Canvas Pleated Lace
Double Dot Cardstock: Decaf in Vintage Dot
 
I hope you enjoyed my project today!  This project is a lot of fun to make, you don't have to be exacting in your design, just be free and easy, gluing and stitching down pretty things!  You can find the gorgeous lace trims I used on this page at Lucy's amazing etsy shop 'Tresors de Luxe' and you can check your local scrapbook stores for beautiful Bo Bunny Blooms (BTW, Bo Bunny is featuring projects all week long using their gorgeous blooms at their blog, so don't miss out having a peek at all the lovely projects!!) xo

Wednesday, January 22, 2014

Saying Thanks in a Whimsical Way {Cheery Lynn Designs Guest}

 
If you've been following my blog this month, you are probably aware that I am the guest designer over at Cheery Lynn Designs (die cuts) this month and am on my 3rd week to share projects made with their gorgeous dies.  I don't know about you but I find I am always in need of thank-you cards, I like to take the time to send a card to show my appreciation to someone.
 
 
 I was in a whimsical mood this week and wanted to get some extra use out of that cute lattice piece I got in my last CL order so I thought I'd use it like a window design on a fantasy style card featuring fairies and flowers.
 
 
For my flowers I just layered a couple of the Sweet Williams floral dies, inked the edges with a little chalk ink and glued some flower stamens to the centers.  I wanted to continue the light filligree look so I used the leaves from the Flourish Leaf strip in white and the Lace Corner Deco in white.  I used papers from Graphic 45 (The papers are some left-overs that I still had in my stash from one of my favorite local scrapstores 'Forever Scrapbooking' in Burlington Ontario....the store is no longer there but the beautiful and sweet ladies that ran the store have a new venture called 'A Scrapbook Story', where they share their ideas through themed kits, you can find them HERE), Prima and Bo Bunny.  I gave the whole thing a more tattered look by tucking in bits of muslin (cheese-cloth) here and there.
 
Cheery Lynn Products used for this project:
 
 
The funny thing is, once I get started playing with my pretty Cheery Lynn dies, I more often than not find that I can't just stop at one card!  I get a few ideas going at once and therefore ended up with an extra card this week! :)
 
 
For this card I wanted to play up the delicate gate die!  I just love the super fine design on the Ornamental gate and I thought it again played well with the Graphic 45 window design in their patterned paper. 
 
 
I used adhesive foam dots to create pocket design behing the gate, I find the shadow this creates gives a nice 3D look to the card.  I also used another one of the Lace Corner designs I used in the top card for this one.
 
 
I used one of my all time favorite CL dies, the Fanciful Flourish as a 'stem' for my floral arrangement and again used the Sweet Williams Strip for my handmade flowers but in this case I curled the petals to create more of a rose look tothe blooms.
 
Cheery Lynn products used for this project:
 
I hope you enjoyed my projects today and hope that I've inspired you to get out your Cheery Lynn dies to play today!  I look forward to sharing another project with you all next week!  P.S.....I was asked by a number of you where to find Cheery Lynn dies in my last couple of posts....You can order them directly from Cheery Lynn Designs, I've linked the dies I used to their shop (above) for your convenience.  xo

Wednesday, January 15, 2014

Little Wishes {Cheery Lynn & Maja Designs}

 
Today I thought I would share a layout I made using two of my favourite design products: Cheery Lynn Dies and Maja Design papers!   I had a lot of fun using the Clock w/Angel Wings die last week in a steampunk design.  But I thought it would be cool to show how versatile this die is for other designs as well.  In my l/o above I changed up the look of the clock a little by adding some flower accents to the middle of the clock design, playing up a more feminine design for the page.
 
I wanted to go with soft butter yellows and spring greens for this page so I went with a few different papers from Maja Design.  I actually combined 5 different collections for this one (they all work so well together! :)
 
Maja Design Papers used in this project:
~ Vintage Spring Basics (1st of March-bs, 6th of May)
~ Life in the Country (Kitchen Garden-bs)
~ Ska vi ta en Fika? (Smulpaj m äpplen-bs)
~ Vintage Autumn Basics (XVI-clocks, XVII-flowers)
~ Vintage Summer Basics (1932)
 
 
I used the Sweet Williams die to make the the cream color flowers in the center of the clock.  I created a flower bud for the center using a couple of the smallest cuts from this flower die and then layered a few of the next sizes up (giving them a little water misting and a wrinkle) for the other layers.
 
I made a heart embellishment for the page using the Celtic heart die on white cardstock and then with a pencil marked out the heart design on some patterned paper from Maja Design to create an underlayer for the heart.

 
I often like to create a counter balance on my page design, for this page I put a lattice design in the top left corner.  I used the Lattice 2 die and gave it a random angle cut to appear like broken lattice.  I then finished the design with more of the Sweet Williams blooms and using portions of the Ivy Corner Flourish dies.
 
 
TIP:  I wanted to attach my lattice so that it stands away from the page a bit, but felt that adhesive foam dots can be a little tricky to apply to finer cuts and might be a little to thick.  So I used some 3D paint like Perfect Pearls to the back of the die cut piece.  When dry, I added some adhesive to the dried perfect pearls and stuck it to my page.  This gave my lattice just enough 3D effect that I was going for.
 
 
Cheery Lynn Dies used for this project:
 
I hope you enjoyed my project for today!  A few of you have asked about where to purchase some of the products I've used on my projects.  I've provided links to all the dies I used from Cheery Lynn Designs, just click on the name of the die (above) and it will take you to their website.  Maja Design also has a storefinder at their website so that people can find retailers in their area.  Good news is that Maja Design had a booth at the Winter CHA this year so hopefully we will be seeing more and more retailers carrying their gorgeous products in the North American market!  In the meantime I can suggest you try out The Scrapbook Diaries as a great source for Maja Design papers, Janene has a nice selection of their papers! xo
 
NOTE:  A little Update!  I just got news from Natasha Naranjo Aguirre, her online store 'Moments of Tranquility' has a full selection of Vintage Autumn and Vintage Summer Basics by Maja Design in her store! Here is a link Moments Of Tranquility.
 

Friday, January 10, 2014

Enjoy {New Dusty Attic Chipboard!}

 
I don't know if I meantioned this yet, but Dusty Attic recently announced the new 2014 Design Team and I'm thrilled to have been asked to stay on another year (I just love me my DA chippies!).   So here is my first project for the year using their gorgeous new chippies!   I've always been a fan of the natural elements that Dusty Attic has designed (grasses, wild flowers, branches etc.) and I was so delighted to see the new Reeds #2 (here in Canada we call them Bullrushes). I love the way they kind of 'hug' the photo.
 
 
For my Reeds chippies I painted them with a coat of Gesso first (I find this helps the paint and ink colors show up better).  I then gave the rushes a light coat of Dusty In Color paint (Pesto) and used a brown ink pad to tint the top of the stalks the dark brown.  I had a brown ink pen that I used to add a few brownish details to the grasses.  Here are a couple more detail shots of the page....
 
 
I used Tim Holtz tissue tape and some Prima, Bo Bunny and Tim Holtz stamps to add a little design in the right side of my page to counter balance the central design.  And then smudged on some Donna Salazar Distress Inks over the design.

 
This is a close-up of the beach elements I used on this page. 
Dusty Attic Supplies used in this project:
~  Reeds #2
~ Dusty In Color "Pesto"
~ Dusty Attic Mini Roses 'Caramel'
 
I hope you enjoyed my project today, I look forward to sharing many more fun idea's using Dusty Attic's gorgeous chippies over the course of the year! xo
 

Wednesday, January 8, 2014

VIDEO TUTORIAL: Steampunk Journal Cover {Cheery Lynn Designs}

 
Hi everyone!  I was recently asked back by Cheery Lynn Designs to do another month of guest work for them, so here is my first project this month using their gorgeous dies!   I've been admiring the beautiful new steampunk designs Cheery Lynn came out with recently so I'd been itching to try a mixed media style journal cover using a few of the new die cuts.   I was thinking to make a 'diary' style journal, something that would be handled more as opposed to an 'art journal', so I wanted to get a nice embossed look to the cover and not go too 3D with the embellishing.  So using the Cheery Lynn steampunk die cuts seemed like the perfect solution to getting that subtle embossed design for my cover.
 
I thought I would record my process as I created the cover so that you all could watch the process, I always think a visual is sometimes a lot easier to follow than writing down the instructions, right?  So grab yourself a cup of coffee (or tea) and take out a few minutes to watch the process :) 


I hope you enjoyed my video tutorial!  Here are a few close-up photos of the cover design as well as a photo of the back of the cover....


Cheery Lynn Design Products used for this project:
*mists and other products used for this project can be found listed in the descriptions at my youtube channel.
 
I hope you enjoyed my project as much as I enjoyed making it!  I'm looking forward to sharing more fun Cheery Lynn Design projects with you in the upcoming weeks! xo
 

Wednesday, January 1, 2014

A Quick Card {With Maja Design}

 
Hi everyone!  We just got back from a little mini-vacay visiting my brother and his family at his lake house, so nice to spend a week just relaxing and having fun with family!  But I realized I have a post I needed to get done for Maja, speedy-fast!  So I thought, what better time of year to show that not all projects done with Maja goodies need to be overly detailed or time consuming.  This card came together quick and easy.

I used a scrap of pink paper I had left over from another project from the Sofiero collection as my background, lightly inked and distressed the edges and tore a little 'V" having some of the rose paper peeking out from behind (I simply used a cut off strip from the title part of the paper for this).  I then cut out 2 little 'postcard' designs from one fo the Vintage Spring Basics papers and added a clock from a Vintage Autumn Basics paper as an embellishment.  Here are the papers I used for this card....


I used these Maja Design products:  Sofiero-Enjoying the Fragrance-bs, Vintage Autumn Basics-XVI, Vintage Summer Basics-Memories.

TIP:  I like to save the little strips you cut off from the bottoms of the pages to use on cards, they have great little phrases and designs!

So, how long did this card take me?  15 minutes!!  Yep, even during the holidays you can get a little scrapping on if you can just cut out a tiny bit of time for yourself!  Thanks for stopping by today and I just want to say I've so enjoyed being on the Maja Design team for this past year and look forward to sharing lots of new and fun ideas with you all over the next year! xo xo

LinkWithin

Related Posts with Thumbnails